SequencomatV3
is an 8 track 16
step midi stepsequencer
in Max/MSP with a touch control surface.
Original created for (now discontinued) Jazzmutant
Lemur, also working with the new Lemur
for Ipad by Liine. (But
it is not a standalone App, because it needs a computer running the
maxpatch.)
The main concept
of Sequencomat is based on classic hardware stepsequencers, with a
special ergonomic surface, designed for 2 handed touchscreen
control. This enables fast and direct acess to all
main functions during playback. It is thought for live jamming and
studio sessions.
Each track of Sequencomat has independent
Midichannel, time divisions, playdirection and tracklength, which
allows polyrhythmic patterns. Stepvalues for octave, note, velocity,
length, delay, control change and propability on each track. All
stepvalues with a range for the output and randomswitches, which can
bring the machine somehow to life...
As all classical stepsequencer, SequencomatV3 does not make any sounds
by itself, but it gives you a wide variety in triggering your synths
and
drummachines, may it be hard- or software.......
works with free max runtime
and parallel with max4live
combinable with any other
Lemur projects (including MU)
8 tracks
with 16 steps
each:
all values are changeable
during performance and saved within
patterns
trackvalues:
midichannel (trigger any
hard- or software synth)
timing
(1/2-1-2-3-4-6-8-12-16-24-32 steps per bar) and play
direction
steprange (1-16 enables
polyrythmic patterns)
startpoint (to skip sequence)
stepvalues on each track:
octave (amount definable at
maxpatch)
note (scales definable at
maxpatch)
velocity
length (relative to clock
division, maximum adjustable at
maxpatch)
delay on trigger (to create
groove/swing, set maximum on maxpatch)
propability on step
control change (midichannel
and controller saved within pattern)
program change (as CC on
controller 129)
random variation, switchable
on each step(!) for octave, note, velocity,
length, delay, CCs
range function (min/max) for
the output at
velocity, length, delay, CCs
transpose all values up or
down on octave and note (within scale)
all stepvalues with "set
all"-function
additional
controls:
track-
and step mute
XYpad for triggering rolls
and/or control-change variation on 2 axis
editing and patterns:
single and multiple track
editing
copy and paste tracks
100 patterns (10 banks with
10 patterns each)
automatic pattern chaining
(up to 10 patterns=160 steps)
load/save sets
Overview:
How
does it work?
Sequencomat
consists of 2 parts: The heart of the
sequencer is
programmed in max/msp and works on your computer (Mac or PC) using
cycling74s free max runtime. The
other part is a Lemur control
module which runs within any Lemurproject (on Jazzmutants original
hardware Lemur or on Liines iPad App for Lemur).
Both parts are connected with a bidirectional OSC connection: entering values into the
maxpatch is done
by pushing controlls on the Lemur and visual feedback (e.g. during pattern change) is given
from max to
Lemur. It is important to notice
that
the Lemurtemplate itself does not send any Midi - all Midi handling is
done by the maxpatch, which can send to all Midiports installed on your
computer.
With "virtual Midicables" (e.g. Loopbe on PC or IACports on Mac) you
can route that Midi into your Digital Audio Worksation (DAW) or other
software. If you got a Midi hardware interface on your computer, you
can also send Midi out to hardware synthesizers or other hardware gear.
In case you want to trigger several Midiports, you can use a standard
Midi patchbay to distribute the signal or split the Midiport for track
1-4 and 5-8 within the maxpatch.
Synchronisation can be done in 3 ways:
Midimaster, sending a
clock
signal out to other soft- or hardware.
Midislave, receiving
clock
singal from other soft- or hardware.
Rewire slave (if you got
a DAW
as rewire host)
Midimaster
and -slave use a
MidiBeatClock (MBC). This is a simple clock type that works with most
gear
including old hardware. Midi
Time Code (MTC) is not installed. To
make it clear: Sequencomat is not
an App!
It is a software that needs an App (Liines Lemur App) or an original
Jazzmutant Lemur to communicate with other soft- and hardware. It is
not thought for triggering other Apps on the iPad. Although you can
route the Midisignal from your computer back into the iPad and
therefore trigger Apps, I would suggest to use another sequencer if
your main goal is making music with Apps.
In case your main goal is to cut the computer within your setup and
trigger hardware synthesizer directly with an iPad,
Sequencomat is also not the right choice. You need a computer to run
the maxpatch.
This can be a rather old computer and you can cut the DAW or other
software from your setup,
triggering hardware directly with Sequencomat, but a computer is still
necessary.
The setup Sequencomat is made for, is if you got a computer with some
software plus hardware gear and you want to trigger all of them with a
touchscreen stepsequencer (...the most usual setup for electronic
musicans these days, I think). In this case Sequencomat v3 is still the
most elaborated touchscreen stepsequencing solution available on this
planet. :o I wonder myself, but at the moment [Feb 2013] Apps can
hardly do half of the stuff
Sequencomat offers....
History
and version guide:
"Sequencomat" is the name
of a whole
series of stepsequencers I have made for the Lemur since 2009.
In common the higher
the version the more details you can control. V3 is clearly my flagship (for details see FAQ).
There is a free lite version, which covers about 60% of functionality
and a paid full version, which match this manual. The table below
compare both versions:
timing play
direction midichannel
steprange startpoint
-
stepvalues for
octave
note
velocity
length swing
step propability control
change / program change
-
rollpad -
set and patterns saved via max
- defineable scales and
octaves (major, minor,
cromatic, custom scales...) for pitch; independent defineable for track
1-4 and 5-8 -
all stepvalues with switchable random
function! (this feature is quite
unique,haven´t seen it on other stepsequencers yet...)
-
auto pattern chain: combine
patterns in a timeline
- auto
save: automatic saving before
patternjump, in auto pattern chain or manual mode
- exlude function for
trackloading
- 20 color templates including
4
user slot
- runs parallel with lite version
(= 14 tracks at all!)
Music-interface is a
small
company. I care about my users. If you got any question about your
setup, contact me. :)
Ordering:
If
you have played for a while the
free lite version and want to order the full Sequencomat v3.4,
please
drop me a mail: mat@music-interface.comDescribe
your setup in short words and experience with lite
version. I will
answer within the next days and you will get a paypal
request. After payment I send the Maxpatch and the Lemurtemplate
via email. (Using paypal is possible without an account, all credit
cards are
accepted)
The
regular price for this sequencer
is 99,- Euro.
I know there is a lot of discussion about software pricing.
But I
am a bit tired of it....
Take into account that it took years to develop this sequencer,
including documentation and ongoing support.
I give a lite version for free, please don´t ask me for a
price
drop on full version. (imho: App prices will not work for a Midi
stepsequencer, because it is a nische product with only a few sells and
support will not cover those prices as well.)
You can get 50,- Euro payback, if you shoot a short
video showing SequencomatV3 in action which I can post on youtube. This
video
should be no longer than 3 minutes and delivered within the first 20
days after receiving the patch. (Due to experience I only give payback,
no credit.)
Full license users of SequencomatV3 will get free updates, whenever I
make one.
SequencomatV3 is sold as "working beta". Although I made a lot of
tests, I can not guaranty that it works as described under all
circumstances - because possible setups are to complex and differ to
much. Saying this, the free lite version of Sequencomat can be a good
indicator if it fits to your setup. (All critical elements, including
the clock, are the same on lite and full version).
Feedback
of users:
Wayat
(messageismusic): "What
an amazing work!!! I really love it! Particularly automatic changing
pattern, multitrack
edit, max patch save/load function, step velocity, and physics..." Daniel
Troberg (elektron.se): "I really really like your
sequencer!!! its
great!" "If you have a lemur and
want
to have the best stepsequencer for it, you should look no further, the
sequencomat is the bomb!"
This
rather short demo video shows full and lite version of Sequencomat
running on the same iPad. Connection was done through my Wlan
router, but works fine as demonstrated.
Version:
3.4
Showing
new features in 3.4.
Program
change as control change message send stepwise and tight on step.
New
way to make patternchains and blinking feedback.
Version: 3.0 (beta)
This video introduce the main
functions of
SequencomatV3.
Track and step values, channel
change, multiple editing, control change variation and triggering on
the rollpad are shown.
The video was shot with an early beta version, some functions are
already expanded (e.g. more octaves). Patterns and automatic pattern
chaining was not integrated in this early version.
Version:
3.2
Video showing the new functions in
V3.2
steppropability, 8CCs attached to track, random stepvalues for
velocity, length and CC
Version:
3.3
Video showing new functions in
V3.3 and new color
templates
for controls!
...like predefined scales and octaves with dependent grid on controls,
random on note, step propability, autosave + pattern chain
(allows to live edit up to 160 steps), new colors for
controls and appearance, new rotary contols for bpm.
all live recorded (midi and audio) and synced later to video for better
sound quality.
using sequencomat V3.3 as midi master clock
Version:
lite (here on Ipad)
Video showing the free lite version of
Sequencomat.
Here presented on Ipad,
via the new LemurforIpad-App
by Liine....but SequencomatV3
lite is also available for hardware Lemur!
To compare the free lite and the full version of Sequencomat, please see here.
Version: 3.1
Sequencomat
triggers Ableton 8.1 in combination
with Jazzmutant MU
(max4live, Ableton control surface)
demonstrating sync, beatconstruction,
recording midi
(and random pattern chains on an e-piano lick...);
masterclock
by Sequencomat.
Version:
3.1
SequencomatV3
triggering
audio clips and
sliced to midi beats in Ableton Live.
Triggering clips in
Ableton is not the main focus of this sequencer, but it is possible via
midirouting. Also effect on/off or everything you can route to a
keyboard…
CCmodulation is done by
the sequencer and feedback in MU via the m4l connection.
SequencomatV3 works great
with MU, but also with any other DAW or even as standalone.
Version: 3.2
Here is a detailed
setup guide for
Sequencomat.
I talk about (and show!) the OSC-connection including where to find the
IPs, the OSCports, the Midiports (virtual Midicables) and the settings
and preferences in your DAW (here Ableton, but it might be equal in
other DAWs)
The video is shot with the new v3.2, but it is also usefull for setup
previous versions.
User videos (with more
focus on music):
Version: 3.0
Here
are 2 videos from Daniel
Troberg
(elektron.se
-
founders of machinedrum)
He is testing the latest beta version and I asked him to make some
videos demonstrating Sequencomat+hardware.
I really enjoyed what he came up with :)
In the first video Sequencomat
V3 triggers a nord modular G1 on the first 4 channels
and the G2 on the 4 following.
Version: 3.0
In
the
second video a real massiv modular system is triggered with
Sequencomat.
wow (!)
lemur sends note data, modwheel data, midiclock.
Daniel is himself deep into stepsequencing while working on machinedrum.
He enjoyed playing and said Sequencomat is a fantastic tool...
thanks for your support
_____________________________________
* Both videos show
Sequencomat
V3 as masterclock (run its own internal max clock)
and triggering the hardware directly via midirouting. That means,
although you can sync to any DAW (like Ableton, Logic, Protools), you
not need to, to run this sequencer.
Version:
3.3
(full
and lite parallel
on 2 iPads)
Thomas Schmidt has made a user video showing the full version of
Sequencomat and lite version running parallel on 2 iPads.
He
is constucting some music live.
Version:
3.2
Felix da Funk has also made a user video showing the Sequencomat V3.2
in combination with Jazzmutants MU (a controller for Ableton live)
He
is constucting some music live.
Version:
3.1
“Morton
Noto” is a live performed ambient song on the Lemur, using my
SequencomatV3 and Scalomat.
The song is inspired by
the work of Morton Feldman, John Cage and Alva Noto. These names were
dropped in talk with Paul Connolly (www.brightbluebeetle.com/),
one of my customers, while talking about his perfect setup.
So I sit there on a
sunday morning and listend to the work of these great
artists… and was deeply impressed. After that I decided to
put these fresh input into a song. Of course I wouldn´t mess
up with these guys….it was just a source of inspiration.
Version:
3.1 (with additional user-control)
A
remix of Schuberts “Ave Maria” by
L’Oiseau Mecanique (LOM).
He
is one of mySequencomatusers
and made this for a demo video of my tool.
Beneath Sequencomat, Spectrasonics Stylus RMX was
used. Therefore he expanded the functionbar of Sequencomat by 1
container (far right). This showing the flexibility of the Lemur and
the templates…
The
song is not finished and got more demo charakter showing the functions
of the sequencer… but I love it! I host it for him as long
as he got no homepage till now
You can get a free mp3 here.
Version: 3.0 (beta)
Live
Stepsequencer Jam "Peppermind"
Another
video in combination with Ableton 8.1 and Jazzmutant MU
demonstrating
pattern, automatic pattern chains, grid jumps and more....masterclock
by Sequencomat.
(Shot with a beta version, but I like the style, so I kept the
video....)
Lemur template (based
on V3.4)
This
manual will guide you through
all functions of Sequencomat v3. Please read it carefully to make the
best out of your step sequencing experience.
Main
screen:
trackmute, muted tracks get
darker
de-mute all, press this
switch to de-mute all track and steps at
once
stepmute, muted steps get
darker
switch for single/multiple
editing
trackchoice, selected track
gets red
control change LED (black =
muted, grey-white = sending values)
track LED (show if a tone is
really played, based on propability;
blue = play, black = not played)
main stepmatrix
exclude LED (marked tracks
are excluded from pattern loading)
range for stepvalue output
stepvalues (here: velocity)
step LED (stepstatus
on selected track: black=no step, brown=step, not played (muting /
propability), white=step)
random switches (generates
random values on selected steps)
slider
to set all stepvalues at once
function
choice (change
content of the purple container, 10 -14)
This
sequencer is made for fast and
direct editing many aspects of the sequence: You can switch
(15) between different
functions (here: velocity)
while
your main
stepmatrix (8) still
keeps visible. This allows you to delete or enter steps on tracks
parallel with
editing the stepvalues on one or more selected tracks.
Steps can be set any time at the main matrix. But to change stepvalues
(e.g. velocity) a concrete track have to be selected with trackchoice (5).
The selcted track will get red in the mainmatrix and stepvalues of this
track will be displayed on the function. Active steps on the selected
track are marked by the step LED (12).
This way it could be seen very fast which values are to change. Step
LED does not only reflect the steps set on the track, also if they are
played at the moment. If the LED is white the step will be played. If
the LED is brown, there is a step, but it is not played based on muting
or propability function. Black LED means no step at all.
Track
LEDs (7) reflect the
steps propability status. If the step is played, the LED got the
background color (here blue). If the step is not played based on
propability it will get black. Steppropability can be set
independent for each step and track. This can cause a lot of
visual feedback on tha mainmatrix, therefore the LED is hold in
background color.
It is possible to edit
the stepvalues of singel
or multiple tracks. If the switch
(4) is off, the trackchoice
(5) is in radiomode. A Jump
to a track will get automatic
feedback on the
Lemurfaders reflecting the stepvalues. If the switch (4) is on, you can
choose as many tracks as you want (all
will get red in the matrix) and edit the stepvalues of them all
together. However - in case
that
more than 1
track
is selected, no visual
feedback
is
given on the Lemur
objects! The values
might differ, so what should be displayed? (a reminder
"multiple track editing - inaccurate feedback" is written accros the
stepvalues) Whenever you variate a stepvalue object it is routed to all
chosen
tracks. The terminus "object" means, that e.g. changing 1 value of
Slider within a MultiSlider will route all MultiSlider values to all
selected tracks.
Trackmute
(1) and stepmute (3) are
located at the border of the interface. Muted tracks or steps will not
be played (CC variation is not muted, but it can be muted within its
function control) and therefore get darker in the main matrix. Muting
works across patterns and is not part of patternvariation. With the de-mute all button (2)
you can de mute all steps and tracks, which is usefull e.g. at the end
of a break.
The different
functions of Stepvalues will
be described in detail within the next chapters. In common there is a
slider on the right to set all
stepvalues (14)
and a range
object on the left (10) which
controls the minimum and maximum interpretation of the stepvalues (e.g.
45-75 instead of 0-127). That range concept is unique on that
sequencer. It does not only give a higher precision for small value
changes if the range is shrinked and therefore the faderway is now used
for less
values. It also allows to make later adjustments, like making a whole
track louder, without changing each stepvalue and keeping the relative
positions of stepvalues.
To me it is one of the core points of Sequencomat. The random
switches (13) are another
unique feature. If activated they will create a new random stepvalue
every time they are triggered. As these random values are interpreted
within the range and can be activated stepwise, I like to call it a
"controlled random". This combination of range and random brings the
machine somehow to life....
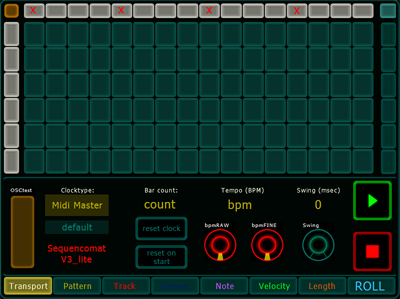
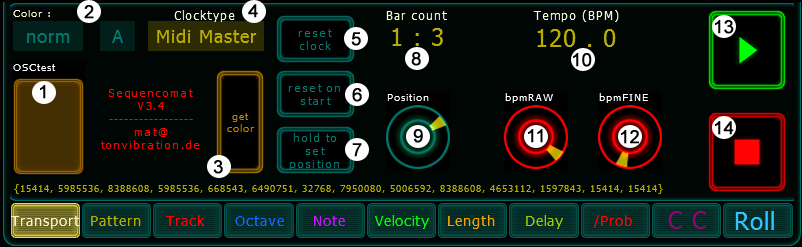
Transport:
1. OSCtest button
2. Colortemplates
3. get color
4. Midi clocktype
5. reset clock
6. reset on start
7. hold to set position
8. bar count
9. position wheel
10. bpm monitor
11. bpm raw control (+/- 10 bpm each rotation)
12. bpm fine control (+/- 1 bpm each rotation)
13. start
14. stop
On the left side is a OSC-test button
(1)
for checking the Lemur<=>Max communication.
If Lemur => Max works you can remote a switch on the maxpatch
and
if
Max => Lemur also works that switch will turn on a light on the
button.
So
if both ways work you can turn the
light on and off on the
Lemurs
test button.
With the dropdown menus for Colortemplates
(2), all colors of
Sequencomat can be changed. 20 colortemplates are predefined including
4 mainley grey
colortemplates and 4 defineable userslots. Colortemplates do not affect
the performance in any way - it is just
eyecandy. For more information about colortemplates, please
see here.
This
sequencer has 3 different clock
options (4) to synchronise
with
your other gear:
In "Midi
Master" it follows an
own internal clock (that makes this
sequencer pretty much a stand alone....beside
the fact that you still need
some instrument to trigger) and
you do not need any
DAW at all. The
Midimaster can also be send out
to a midiport to synchronise a DAW
or hardware.
In
"Midi
Slave" the sequencer
follows a midi sync signal from external
(hard- or software)
In
"Rewire
Slave" it connects
automatically with any rewire DAW (see
details of the clock settings at
the maxpatch.)
You
can choose the clock
mode
on the Lemur (drop down menu) or on the
maxpatch. To reset the clock manually
(5) with a
button any
time. Also you can choose between "reset
on
start" or "continue" (6) from
actual position when hitting start.Bar
count(8)
is reflected
for each clock type.
Tempo
is controlled by 2
endless rotarys. While bpm raw (11)
changes bpm +/- 10 each
rotation, bpm fine (12)
adds +/- 1bpm . The actual tempo value is shown in a bpm
monitor (10) above with one
decimal
place accuracy (e.g. "124.7"), default is 120 bpm. Play
(13)
and stop (14) is
located on the far right.
Play, stop and the bpm control does not work in "Midi Slave" mode,
because they are controlled by the master.
The Position
wheel (9) will turn
when playing, set the resolution of the wheel on the maxpatch
(default is 10 Quater notes per rotation). If you press and hold
the lowest
button
(7) you can turn the wheel (9)
and the
songposition will
follow in quater note steps.
This makes sense on some
polyrhythmic patterns. If the clock is in
rewire mode, your DAW will follow(!). If you are in Midi slave or
master mode only the songposition of
Sequencomat will change. If you use "reset on start" Sequencomat will
jump to your selected position each time you press start, until you
once press "reset clock" which will set it to 0 again. The spooling of
songposition works during playback or if the sequencer
is stopped. In case of playback the external clocksignal will continue
and the songposition will catch the next quater note. During
spooling the note-out is muted.
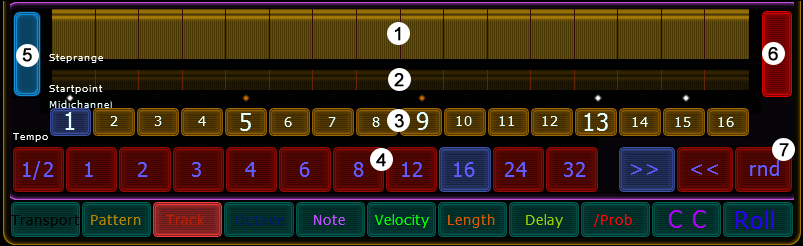
Pattern:
1. style of patternchaining
(up - down -
updown - random)
2. timeline for
patternchaining (1/4 bar -
1/2 bar - 1 bar
- 2
bar - 4bar)
3. program pattern chain
4. activate pattern chain
5. clear CCs on all selected
tracks / "1 step back" in program chain mode
6. clear steps, deactivate
all steps in the
matrix / "clear chain" in program chain mode
7. copy track, copies the
selected track (if
more
than 1
track is chosen it copies the lowest track)
8. paste track to all
selected tracks
9. patternbank with 10 slots
10. patternslots (saved
patternslots are
highlighted, active pattern is white)
11. autosave (if active,
changes will be saved
to actual pattern before selecting a new one)
12. hold
this button and
press a patternslot
(6) to save
13. pattern jumping (direct - 1/2 bar - 1bar - 2 bars - 4bars)
14. actual pattern number
15. exclude switches for
range functions
16. exclude switches for
tracks (track 6 and 7
are excluded)
This sequencer got 100 patterns.
The patterns are sorted in 10 banks
(9) with 10 patternslots (10)
each. Changing a bank will update the highlighting of saved
slots
-
so
you see which slots already contain a pattern - but it does not
trigger a pattern. For triggering a pattern
press a patternslot
(10). The actual pattern get highlighted and is
also indicated in the monitor (14).
A
pattern jump can be done immediately, if "direct" is selected
on patternjump
(13). That enables quick
jumps between different variations, even within a
beat, and pattern can be played like an instrument. Patternjumps can
also be set to 1/2 bar, 1 bar, 2 bars or 4 bars, in that case
patternjump is done with the next of these beat divisions.
After triggering the next pattern to come will blink (with the rate of
8th).
To save a pattern press and hold save
(12) while hitting
one of the patternslots
(10). The pattern is now
saved to that slot and the slot will be highlighted. A saved pattern is
always a snapshot
of all actual values.
To erase a pattern (and its highlighting) press and hold clear steps (6) while
picking the pattern slot.
If
autosave (11) is active all
changes will be saved automatically to the actual patternslot before a
jump to a new pattern is initialised. It will delay the patternjump a
few
milliseconds.
Clear
steps (6) clears all
steps in the matrix. All other settings (midichannel, clock division
etc.)
stay the same.Tip: I suggest to use bank 9 for saving
some empty default patterns with different Midichannels or timing.
Clear
CC (5) clears the CC on
all chosen tracks. It resets stepvalues and range and mute the CC,
midichannel and controller number will stay the same). In program chain mode both buttons (5+6)
got another function. Copy
track (7) copies the chosen
(red) track to a buffer. If more
than
1 track is activated (multiple editing) it will copy the lowest track. Paste
track (8) paste this
before copied track into all chosen tracks.
During pattern construction copy/paste is really usefull. If you e.g.
work on
a beat and got a bassdrum on track 1, just copy it to track 2. All your
trackvalues (like clock division, midichannel ect.) will be
copied. To make it a snaredrum just change the note of track 2 and set
some other trigger points in the matrix.... (double the BD-track while
playing does not make any harm, even if both tracks trigger the same)
Beneath jumping manually through the patterns, Sequencomat can also do
an
automatic
pattern chain(4).
In
that mode the sequencer will automatically jump to another pattern
after a
special time.
To program a pattern chain activate chain
prog (3). The current
chain will be displayed in a monitor across the mainmatrix and across
the patternslots a message "cain programming" will appear. Add patterns to the chain by
picking the patternslots. If
you want to add a pattern from another bank, change the bank first and
then press the patternslot (like loading).During program chain mode"Clear steps" (6) and "clear CC" (5) get other functions
and new labels:
Clear steps (6) will clear the chain (delete the whole chain) and
clear CCwill erase the last
step of the chain. During chain prog is active hitting the
patternslots will not load the pattern but add them to the chain.
Use the drop down menus to
change style (1) and timing (2) of the patternchain. These can be changed independently from
being in chain prog mode. Finally activate the chain with (4). Chain activation and chain programming are
independent functions and you can programm a chain also during playback.
During an active chain a 2nd
message across the main matrix appears, showing which pattern of the
chain is actually played, what
pattern it will be next and a countdown (based on 32th). Furthermote
you can see the next pattern blinking in the patternslot (as long as
you match the same bank).
With an active chain the sequencer jumps all values in the matrix
according to the pattern. You can still change the triggers and other
values, but all will be overwritten with the next pattern jump. This
can be nice in a live situation where you only want slight variations
of your predefined patterns.
If autosave (11) is active
during a chain, all your changes will be
saved to the pattern before the jump. This way you can edit live all
patterns of the chain. However, you can only edit them whenever they
are active. With jump to the next pattern you also edit next pattern.
You can exclude
tracks (16) or ranges
(15) from pattern jumping and
loading at all. Excluded tracks will be indicated by some red LEDs on
the mainmatrix
between trackchoice and the track. This exclude function becomes
usefull
if you got a drumvariation on the
first 4 tracks, jumping through different patterns, while you work on a
baseline on track5 which you do not want to jump. You can also exclude
the range functions of the stepvalues from
loading. This is usefull if you want to make a fade in of velocity or
CC across many patterns. Otherwise the ranges would jump to the saved
values.
"Exclude"
works only for loading while save is always done to all you
see.
Track
values:
steprange (0-16)
startpoint (0-16)
midichannel (1-16)
clock division (including
triplet notes)
reset steprange to 16
lock
steprange
direction
Steprange
(1) sets start and endpoint
of used steps (stepranges less than 16 will allow polyrhythmic
patterns). Startpoint
(2) skips the whole
sequence to play some steps later
(relative to the timing on track).
You can lock (6) the size of the
steprange and scrub the
play position with one finger (even on multiple tracks) or
reset (5) to all 16 steps with one press (e.g. at the end of a break)
By changing the midichannel (3)
you can trigger any hard- and software
instrument of your set as long as it receives midi. In a DAW you can
adress different instruments at to different
midichannels, step
through while listening (without
midihung!) The Midichannel of
each
track is saved within the pattern.
Clock
division (5) changes the
speed of playback a track, from very slow 2
steps per bar up to 32steps per bar, containing triplet grids. Direction
(7) sets playback
direction of the chosen track(s): foreward, backward or random.
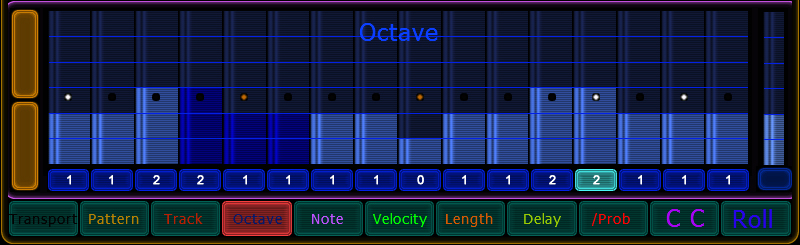
Octave
values:
Octaves
can be set for each step on
each track. You define the range for
octaves on the maxpatch.
Just set the lowest octave (keyoctave) and then enter the other octaves
relative to this devided by a space ("2" will mean 2 octaves higher
then the keyoctave). The screenshot above shows a standard setup: 7
octaves, reaching from -1 to 5. You can enter as
many octaves as you want. Also you do not need to set them in
an ascending order (you can also set them "3 2 4 6 1") or you can use
iterations of the same octave (which will define
propability in random mode).
The octaves and notes can be defined independently for track 1-4 and
5-8. This enables you e.g. to trigger drums on 4 tracks on a chromatic
scale
and notes on other 4 tracks on a special minor scale.
The grid of the Lemurs
multislider
will follow the number of
octaves you have defined. That
function is triggered by trackchoice, so if you change the octaves,
reselect your track before changes are
overtaken. The octave for each step will be displayed at the bottom
row.
This
bottom row are also the random-step-variation-switches.
If activated for a step the octave will jump to a random value each
time it is triggered. So you get a random variation on a stepvalue
(here octave) each bar. On the bottom of the right side is a little
switch, if turned on (and
hold) all random switches are turned on,
if released all random switches go off.
These
random-step-variation-switches
you will find in many stepvalues.
To set all octave values of the track at once, use the slider on the
right.
With the 2 pads on the left you can transpose all values up or down.
Tip:
while using drum
racks
octave becomes handy to switch between
different
samples representing the same drumtype (e.g. if C is always a bassdrum
in your drumrack, you can switch
between different bassdrums)
Active steps on the track
you
are editing are highlighted on the
LEDs - you always see what you are editing.
Here steps 1, 5, 9, 13 and 15 are set (track1 in the matrix). But step
5 and 9 will not be played and therefore get a brown LED. Step 5 is
muted by stepmutin on the main matrix. Stepmuting is also
reflected in darker multisliders (step 4,5,6) Step 9 is not played
based on propability (as described below). Active steps are always
white. While playing the
playposition
is highlighted on the LEDs as well as on
the value sliders (not shown in screenshot). Any changing of steps in
the
mainmatrix will be reflected in the LEDs.
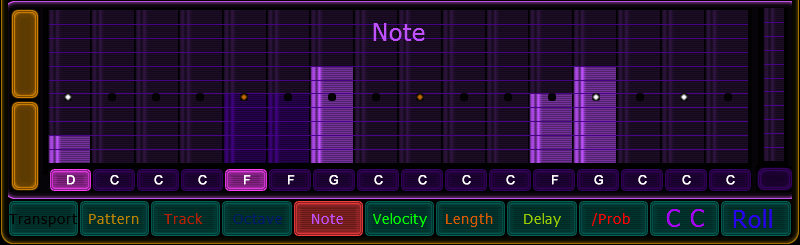
Note
values:
Same as on octave, the notes can be set for each
step on each track.
You define
your scales at
the maxpatch (split
between track 1-4 and 5-8).
Just enter a keynote and the halftonesteps relative to this.
There are shortcuts
for chromatic,
major and minor scales, but
you can enter any halftonesteps you
want.
You do not need to enter them in an ascending order and you can use
iterations of the same note in one scale.
This gives you the most possible freedom in defining them. All scales
and octaves will be saved within a set.
The grid
on the Lemurs multislider
will follow the number of notes you have defined in your scale.
This function is triggered by
trackchoice, so if you make
any changes on the maxpatch,
rechoice your track before you experience them.
The name of the note will be displayed at the bottom. These are also
the random-step-variation-switches.
If pressed for a special step it will create a new random note (within
the scale) each time it is triggered.
With iterations in your scale definition you can change the propability
of a special note being played randomly.
To set all notes of the track at once use the slider on the right.
With the 2 pads on the left you can transpose all notes up or down
within their scale.
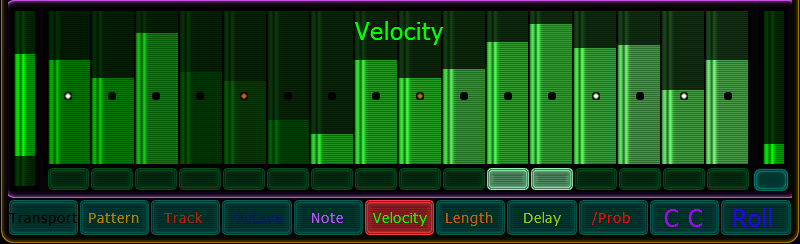
Velocity:
You
can set the velocity
of each step.
To set
them all at once, use the slider on the right side.
The range object on the left sets the output (minimum
and maximum)
of all values. That range
concept enables
you e.g. to fade in the volume of a track, while all relative velocity stepvalues still count. With
multiple editing you can do that parallel on more than 1 track.
If you activate the random switches
below the multislider, a random value is generated for that step each
time it is triggered. Actually the new value is generated 50 msec after
the triggering. So
you might see already the new value,
while you hear the one from the loop before. (Thats a bit
confusing from an ergonomic point of view, but was the best technical
solution) You can manually overwrite the random value. Notice that
random, as all
stepvalues, only variates within the range. If you choose a small range
you only have variation within that (0-127
might be to much for many random ideas).
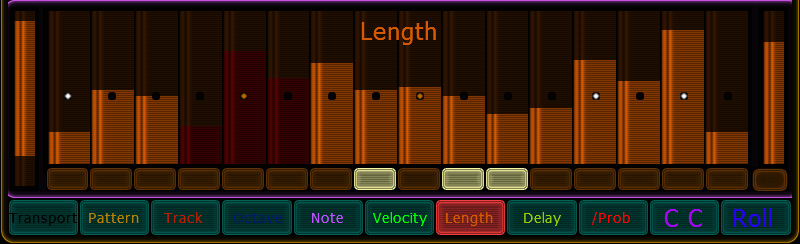
Length
values:
Every
step got it own length. In
contrast to most classic stepsequencers (with discrete scales
like 1/2 step, 1
step) you
can set the steplength on a
continious
scale relative to
the clock division on the track.
The maximum of steplength for all tracks can be set on the maxpatch
(reaching from 1 to 16 steps).
By default it is 1 step. If you use longer steplength please keep in
mind that the noteoff message of a previous (long) step can cause a
noteoff on a later step that shares the same pitch and
midichannel....
Again use the fader on the right side to set all stepvalues at once.
With the range
(left) you can
change the output of all
values, making a track more pizzicato or more legato.
The random
switches trigger a
random value on selected steps as described above.
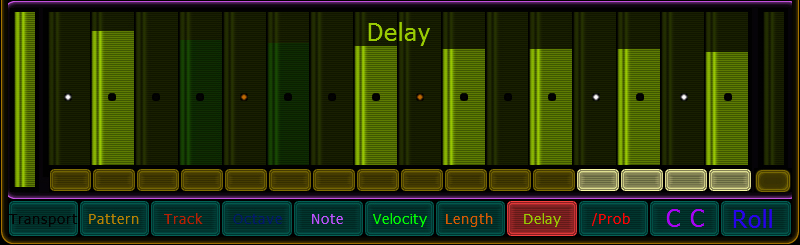
Delay
values:
To
create
swing or groove on your
pattern you can delay the
triggering of each step on each track independently. The picture above
shows a typical swing.
With the slider on the right you can set all stepvalues (if you want
the whole track to be delayed) and with the
range on the left you can fade in the
groove (also on multiple
tracks(!),
if chosen)
Tip:
To route a delay pattern you have created on one track to all other
tracks just choose this track first (so you see the delay pattern) then
choose the other tracks (multiple editing) and give
the sliders and the range a short variation. Now all values are you
have variated are overtaken on all tracks you
have chosen.
By default the maximum of delay on triggering is set to 50 msec, which
is quite enough for a good groove,
but you can change that to whatever you want on the maxpatch. Try
higher values (e.g. "2000") for a more experimental setting ;)
You can also humanize your groove by activating the random-step-value-switches.
The delay
on triggering is also
reflected in the steplights,
giving you
a visual impression of the groove.
Propability
values:
Since
Version 3.2 Sequencomat has a propability
function on
each step. That brings more
variation into the pattern and enables that a special
step is not played every loop, but only in e.g. 50%. It is propability
as that does not mean every 2nd loop, just in 50% of
the cases.
Well, actually the terminus "unlikeliness" would be more clear for that
function, becausethe
higher the stepvalues are, the
more unlikely it is, that the step will really be played
(thats why it is named
"/prob" - inverse propability)
The
left slider gives feedback and also controls the random value, to
compare the steps with: Steps
higher than this value will not be played (here 9 and 12), all
steps below will be played.
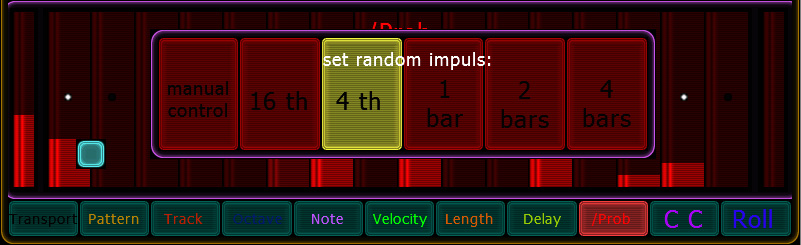
Iniciate
a random impulse by
pressing and hold the small brown button on the left.
A container will pop up a seen below:
You can generat a random value (to compare with propability) on 16th,
4th, each bar, 2 or 4 bars. Random impulses are only given while the
sequencer is playing. This settings will be saved within the patterns
and are independent on
each track!
You can also manually control the value to compare the propability
with. So you can fade in the "density" (more or less notes) of one or multiple
chosen tracks.
The "Unlikeliness"
- or the
question if a tone is played or not - is also shown on track LEDs
above the track
switches.
-blue (background) LED means "tone will be played" (if it is set)
-black LED means "tone will not be played at the moment" based on
propability.
As you can imagine, that can be a big blinking and visual load with all
the steps on/off variation on each track...
But if you use propability only sparely (only on some steps), it will
blink less ;)
Anyway, to keep it realistic, I suggest a random impuls on 4th not on
16th.
A slower impulse rate (2 or 4 bars) enables to play the same variation
several times before changing.
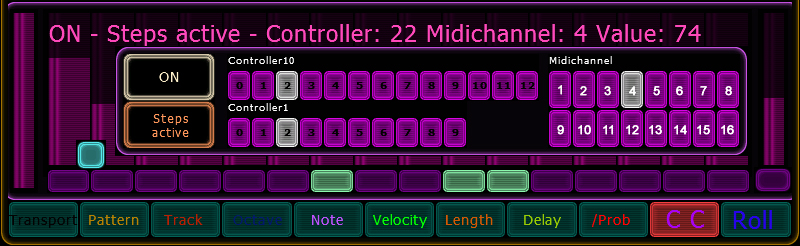
Control
Change
values:
Additional
to all note information,
you can also set a control change
variation for each step on
each track.
Midi-control-change (CC) messages can be routed to anything in your DAW
or external gear, like pan, filter, effect values, whatever. The
timing and steprange of the CC variation is bounded to the
trackvalues,but Controllernumber and Midichannel of the variation is
free to edit and saved within the pattern! Since version 3.4 program change on the selected
channel is sent by controller
number 129. This enables to
switch between sounds, even stepwise. For multiple tracks, use the
highest track for program change to make sure the jump comes in time.
Controlling 127 sounds with the short MultiSlider is not the best
ergonomic way... but shrinking the range for stepvalues help a lot to
get more detailed control.
Again you can set the value
for each step, set all step with the slider
on the right, use the range
for the output
on the left, and set steps to random
variation with the switches
below.
To set Controllernumber and Midichannel press and hold the small brown
pad on lower left side.
A container will pop up as shown on the image below:
You can activate or mute
the CC variation
with top button on the left. If you do not use the CC on that track in
a pattern it might be usefull to mute it, so it does not send out any
information
accidentally. If a CC is muted the LEDs inside the trackmute buttons on
the
mainmatrix will get black, indicating you that no CC is send.
With the mode-button
below you
can activate
the steps (as
shown in the picture) or deactivate the step variation
and set to "range
only". In
that case only the middle position of the range is send. You can use it
as fader or set the value for a special pattern.
With the 2 radioswitch rows in the middle you can set the controller number
and with the radioswitch on
the right the midichannel.
This is working for one ore more selected tracks (e.g. if you
want to set the channel of several tracks to 10). All
values will be displayed in the
textbox written across the
multisliders, so you always have an
overview about the CC status.
The
routing is also saved within the
pattern. That means, while
track1 CCs control e.g. the pan of a
piano in one pattern, it can control the filter of a synth in the next.
However, with that
freedom some confusion naturally can come in, so I suggest to keep the
same controls on the same tracks.
As long as you hold the little brown setup-button (that now turns blue)
and see the setup, control change variation is interrupted and nothing
will be send! (to avoid accidentally CCout while changing
the setup)
For midi-mapping
the range
object on the left is also handy: To control a certain function of your
DAW, stop the sequencer
(otherwise it would send to much info to map) go to your midimapping,
choose a function and move the range (e.g.
ableton automap)
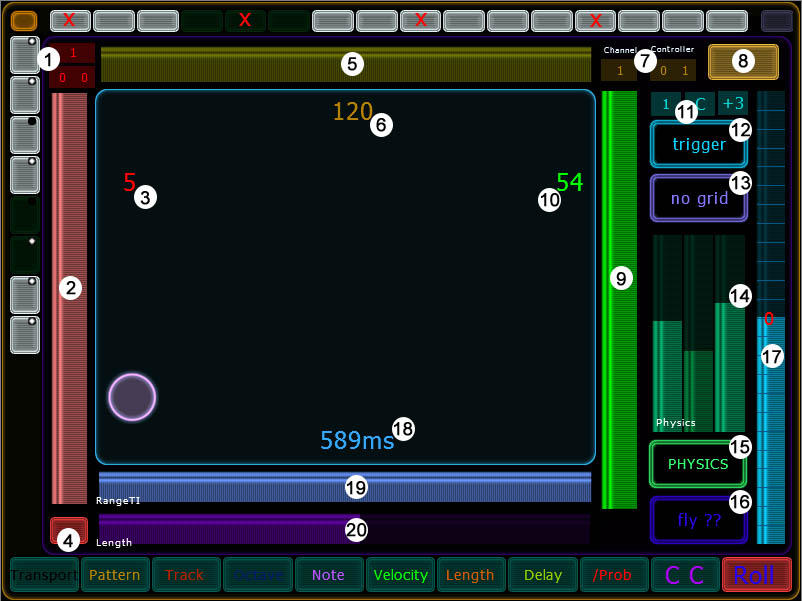
XYpad:
drop down menu for
midichannel
and controllernumber on vertical axis
range for cc output on
vertical
axis
monitor cc output on
vertical
axis
mute vertical axis
range for cc output on
horizontal axis
monitor cc output
on horizontal axis
drop down menu for
midichannel
and controllernumber on horizontal axis
mute horizontal axis
range for velocity while
triggering
monitor for velocity
midichannel, note and
octave of
the triggered tone
mode: CConly / trigger
no grid / synchronise the
triggering
physics of the ball:
attraction
- friction - speed
physics on/off
fly (sets friction to 0
and let
the ball fly)
transpose (added to note
and
octave)
monitor of trigger time
range for trigger time
length of the triggered
note
The
XYpad has 2
modes(12):
In "CConly"
mode you control 2
different CCs on the pad. CCs
can be
manipulated within a range (5 / 9) and each axis can be muted separetly
(4 / 8). Set the midichannel and controller number with drop down menus
(1 /
7)
In "trigger" mode
an additional note is
triggered as soon as you touch the pad. That trigger mode allows
you
to make rolls and flames and also play melodies... Set midichannel, note and octave of the
trigger note with drop down
menus (11). You
can also transpose (17) the pitch. The pitch will follow the scale of
track 1-4 defined on the maxpatch. The speed
of the
triggering is
controlled on the horizontal axis and the velocity on the vertical
axis. Both with a range for the output (19 / 9). The minimum
time of
triggering is 40msec. The length of
the trigger note is set with the
purple slider on the
bottom (20) and is always relativ to the triggertime (balls horizontal
position), e.g. half
slider means 50%.
If sync
(13) is active
a grid appears on the horizontal axis (no screenshot here, but you can
see
in the videos),
enable you to make rolls in sync with the sequencers clock division (2,
3, 4, 6, 8, 12, 16, 24, 32)
While
triggering a note, the CCs can send parallel or you can mute them.
Unlike all other functions, the rollpad is independent from the pattern
section and not saved within a pattern.
It is more a performance space, so I do not want to jump e.g. during an
automatic pattern chain....
But it is saved within a "set" and will restore your values within next
load of the set you use.
The
settings on the
lemur
Version: 3.2
Here is a detailed
setup guide for
Sequencomat.
I talk about (and show!) the OSC-connection including where to find the
IPs, the OSCports, the Midiports (virtual Midicables) and the settings
and preferences in your DAW (here Ableton, but it might be equal in
other DAWs)
The video is shot with the v3.2, but it is also usefull for setup of
other versions.
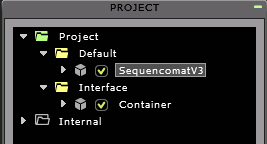
Insert module into a lemur
project
Sequencomat is a module that can be insert into
any lemur project. Therefore open the Lemur editor on your computer
and connect to your Lemur. You can start a new project or load an
existing project and add a new blank interface. Insert one of the
„Sequencomat_v34....jzlib“ into this. They differ between
iPad or
legacy resolution.
You can name the interface (here:
„Default“)
how ever you want. But the name of the modules container should
always be „SequencomatV3“. It is mentioned in the pathway
of the
maxpatch and communication will not work, if that name differs.
You can only use 1 Sequencomat within one
project. Entering more sequencomat modules into the project will
automatically change the container name and therefore corrupt
communication. However – you can combine full and lite version of
Sequencomat, because lite versions name is „SequencomatV3l“.
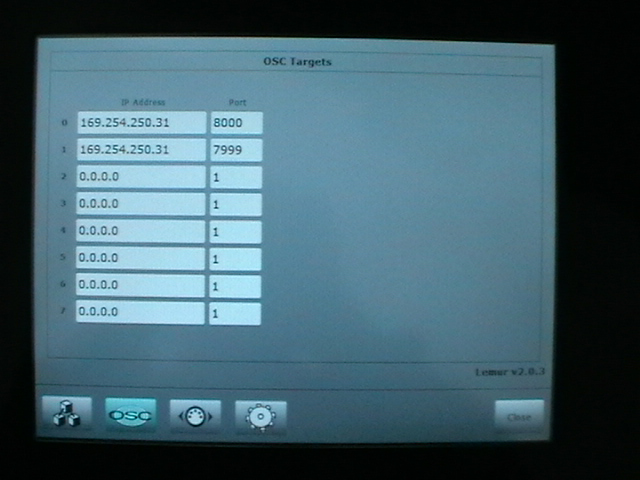
OSC settings
on the Lemur
The
lemur
objects within this sequencer use OSC
target 1
to send information to max.
Therefore you have to define target 1 on the Lemur:
enter settings on the lemur
(left hardware button)
enter OSC
on Liines Lemur App you have to add a new OSC target (only 0 by
default)
on original Lemur 8 targets are given
fill in your computer IP on
OSC target 1
enter a port on OSC target 1
make sure you use OSC target1 not OSC target0 (!)
The
IP adresses
of target 0 (as used in with other modules) and target 1 can be the
same. Actually they will be the same as long as you targeting the same
computer. You
can find your computer IP on your
computer network settings or have a look at "Lemur connected to" in
the Lemur settings, if your editor is connected (for loading
templates).
The
ports of both targets should be different if you want to use
both OSC targets in one setup. (It doesn´t matter if you do not
use both targets at the same
time) To avoid conflicts with the standard port 8000, e.g. in
combination
with
MU (which uses 8000 on target 0 by default) you can use port 7999 for
OSC target 1 (=the sequencer) as I have done
here.
The maxpatch
The
heart of the sequencer and all the calculation is done in
cycling
74s max5. The lemur is just the control surface.
To run SequencomatV3 you need either max
or
free max runtime. The patch is normal max, not in Abletons "max for
live". Normal maxpatches and max4live patches will run parallel.
Put the maxpatch in a blank folder. (It will
also save all sets to this folder.) Before opening the patch load the
module to the lemur and start your DAW (especially if using
rewire).
You can open max runtime and then load the patch or
you can link the patch directly to your desktop e.g. using the
desktop icons attached in the zip. In case you link it directly you
can open the maxwindow by pressing Cntrl+M. The maxwindow will show
some usefull information.
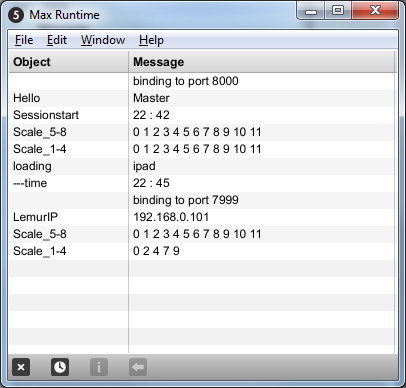
At
start it binds to port 8000 and says hello to the user. It also gives
a timestamp and confirms the Scales (cromatic by default) for track
1-4 and 5-8. Notice that the Scalefeedback is given in contrary
order to appearance in maxpatch (5-8 at top?), this is based on the
inner triggering of the patch. It is confusing and should be
mentioned here, but it does not effect performance ;)
Maxwindow
will also confirm loading or saving a set with timestamp, changes of
port, LemurIP and scales.
While running the patch for the first
time, you have to enter some
settings.
But no worries, this will be saved within the set, so you do not have
to do this every time.....
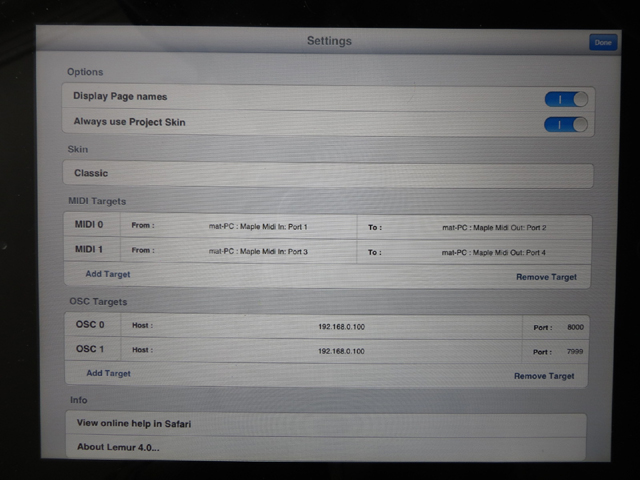
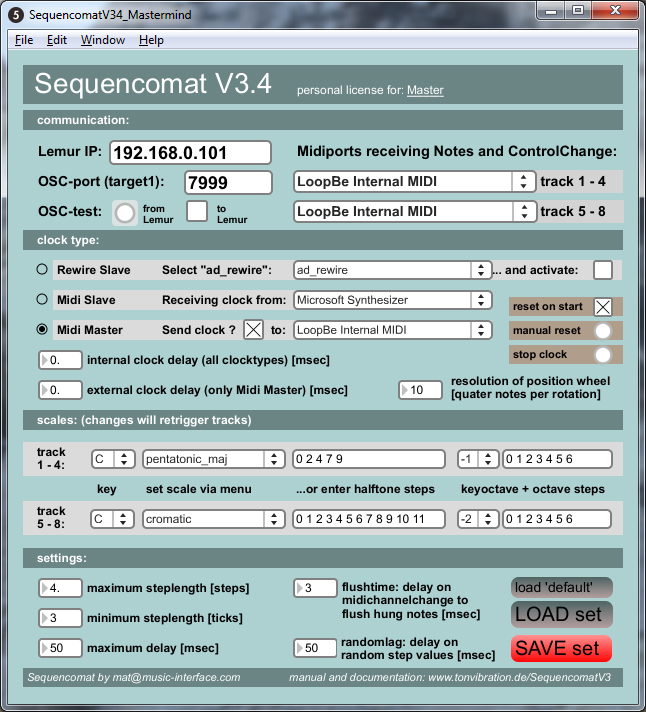
communication:
First we have to establish a OSC
communication between max and
the lemur.
If you have defined your OSC target 1 on the lemur (see above)
one part is already
done.
Now fill in your Lemur IP on the maxpatch (you will find this IP in
the mainsettings on the lemur, use it with static IP!)
and the port you use for OSCtarget 1 on the Lemur (standard is 8000,
here I use 7999 as described above).
You can test
the 2-way OSC
communication with a OSC-test
button on the
Lemur, nested inside the transport container. If you press it, the
OSC-test button on the maxpatch should blink and
the switch should alter between on and off. This represents
"from lemur to max" communication. If the switch on the
maxpatch is on, the OSC-testbutton on the Lemur
should light up. You can test it, by clicking with the mouse. This
represents "from max to lemur" communication. If both ways work,
you can switch with the
light on the lemur
button on and off.
Next choose the midiports,
where the sequencer sends the notes
and CC variation to. You can split the midiports for track 1-4 and 5-8
(which makes sense on
some hardware configurations), but both ports can also be the same. The
drop down menu on "Midiport
receiving notes" will show up all
mididrivers you have installed on your system. Choose one of them
(here: "LoopBe Internal MIDI").
On
PC you can use LoopBe or
Midiyoke. (Maple
Midi seems to be a little
bugy in max while using win7.) On
Mac, please use the IAC
drivers. Do not use the
jazzdemon ports,
because they are for Lemur exclusively!
Remember that Midiport, because we have to activate it in your DAW
settings later.
clock
type:
This
sequencer
can be synchronised via 3 different clock types. You can choose the
clocktype on the maxpatch or on the Lemur.
rewire
slave
open your rewire host
before opening max and running the patch
(so max knows, there is a rewire host)
choose "ad_rewire" on the
drop down menu
activate rewire
with the checkbox behind the menu
midi
slave
choose a midiport, where
to get the clock from
midi
master
make use of the internal
clock of SequencomatV3 (sending Midi Beat Clock, no MTC)
you can send this clock to
other gear, if you activate the
checkbox
choose a midiport to send
the clock to
You
can add
a linear delay to the internal or
external clock signal. That
will help if you got a time shift of
the trigger signal. However, it only works to delay the clock signal,
not to anticipate it. If you use for instance the Midimaster of
Sequencomat and route your
DAW to it, it is properly that you experience the Midinotes from the
Sequencer being a little late. In that case
delay the external clock signal until both fit (in my case 27msec work
fine, but it might depend on your
setup)
You can also change the resolution of
the position wheel. By
default it is 10 quater notes per
rotation.
On the right side of the
maxpatch you also find some entries to control clock directly. "Reset
on start" resets the clock to 0, every time start is pressed. It
is linked to a button in the transport section of the Lemur template,
so it is kind of double control. "Manual reset" sets
the clock to 0 during playback. "stop clock" sends a stop
into the sequencer (new in v3.4, only in case wireless connection to
iPad drops and sequencer to stop).
scales:
Scales can be defined for
track
1-4 and track 5-8 independently. By default they both use
chromatic scales based on C and 7 Octaves
based on -1. There are shortcuts for some common content, but you can
set the halftonesteps and octave rows to whatever you want. For scales
choose a keynote
and enter the halftonesteps
based on that (including 0 for the keynote), divided by space.
"0 2 4 5 7 9 11" for example is a major scale. You do not need to keep
an ascending order, can use halftonesteps
greater than 12 and can also use iteration of the same halftonestep
(which will lead to the same note being triggered in different
positions
of the multislider). You are completely free to define whatever you
need!
The grid
on the Lemurs
note-multislider will follow the number of halftonesteps you have
defined
(maximum is 32... which is a bit unhandy anyway). The changes
you do on the maxpatch are triggered
by
trackchoice on the
Lemurtemplate. So rechoice first
before you see any changes.
If you change a scale all existing patterns will be interpreted based
on that halftonesteps now. (In other words - it does not remember the
notes, but the position within a scale. This enables you to change a
whole set from e.g. F minor to D major)
Octaves
follow the same principles as
notes: Define a keyoctave and
set all steps relative to it.... e.g. "0 1 2 3 4 5 6" on keyoctave -1
will mean 7 octaves in ascending order from -1 to +5. Like on scales
you are free to define the order of ecperience
Scales and octaves are part of your set and saved within. They are not
part of patterns.
settings:
Although
you
control the sequencer on your Lemur, it has some preferences you can
set at the maxpatch.
maximum steplength
in steps for all tracks (0-16, with a
flonum)
minimum steplength
in ticks (with a minimum of 0 ticks a
trigger with length 0 will not be played!)
maximum of delay
on steptriggering in milliseconds (default 50, try higher
values
for experimental settings)
flushtime(*) in
milliseconds
randomlag in milliseconds
(timelag of new random stepvalue (if activated) after triggering the
step)
(*)
This
time is needed to flush
(erase) all midinotes that are currently played on one track
before a midi-channel jump
is fullfilled. It
prevents from
hung midi
notes, because all notes on this track get a noteoff-message before the
channel is changed.
load
and save:
You
can save all
your patterns of a
session and
the settings of
the maxpatch in a set. Therefore stop the sequencer first and use the
save button. A dialog will appear, where you enter the name of
the set. After "ok" the maxpatch will write 9 files into that folder
where it is
installed: 1
file for each track and 1 file for the settings. Therefore - use an
extra folder for the Sequencomat maxpatch!
You can load sets with the load button and entering the name of the
set (**). It will load all pattern and settings, including your LemurIP
and
clock setup. The load default button loads directly a set named
"default". This is
not predefined, but you can save any set as "default" for having a
quick start.
(**) There
is no file
browser, so you have to know the name of the set, just name it like
your song...
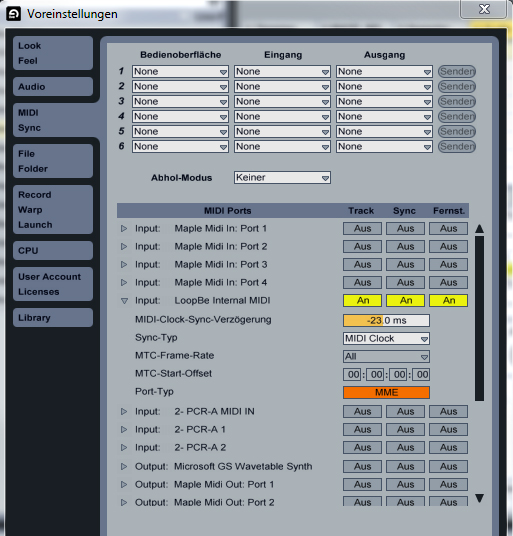
The
preferences in your DAW
In
your DAW (digital audio
workstation) you have to open some "in"s to receive the data from the
patch.
The screenshot shows the preferences in Ableton Live 8
Please activate the "track"
and
"remote" input
for that midiport you have chosen on the maxpatch ("midiport receiving
notes"), here "LoopBe Internal MIDI".
In that screenshot a "sync" input is also activated (in the middle).
This is only
needed if you use SequencomatV3
as master
clock and want to sync
Ableton to it. If so, you have to
activate the
"EXT" button in Ableton, which will appear in the upper left corner of
Ableton, as soon as you
have
opened a "sync" in.
For using rewire
clock you do
not have to activate any sync out.
For using midi
slave, activate
a sync output on a port, (but never
use the same port for clock in and
out!!!!)
and choose that port on "receiving clock from" at the maxpatch.
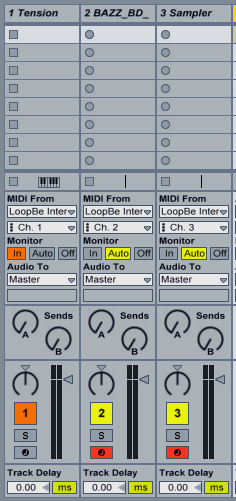
The
track settings in Ableton
On the tracks in Ableton select that Midiport at "MIDI from" you have
chosen
on the maxpatch (here: LoopBe) and enter a Midichannel for each
instrument. With Midichannel routing you can adress up to 16
different
instruments with SequencomatV3. All channels will be saved within the
patterns (so one can be a
drumpattern, while the other is routed to a piano) and you can
combine different instruments in one pattern with
independent
midichannels on each track.
To hear any notes played by the sequencer activate "in"
at the monitor
(the channel becomes orange, see channel
1) or
activate record (with "auto"
on the monitor, see cannel 2 and 3). To record parallel on more than 1
channel, you have to deactivate
"exclusiv" for "arm" in the preferences.
Time
accuracy:
One
important thing on a sequencer is
a stable and reliable clock.
During Midi synchronisation there might appear 2 problem relating the
clock: instability and time shift.
Instability means a variation
in triggering (like some triggers
come a little early, some a little late). On humans this is natural,
but you wouldn´t expect that from
a
machine. While working with DAWs, we are used to 100% exact timing.
Anyway, a midiclock is never 100% stable. This might be due to the data
resolution of the midiprotocol, some hardware configuration or CPU
processes, if the clock is hosted by a computer. So you try to
get the most stable clock, but have to be lucky with 99,8% stablity.
This problem is normal with all midi synchronisations, including
hardware stepsequencers, but can be unknown for musicans who worked
only within their DAW till now (therefore i mentioned it
here).
Time
shift means a linear delay
on the triggering. Although this effect might be bigger in amount, it
is not so critical, because you can correct it via
"midi-clock-sync-delay".
During constuction of this sequencer, one focus layed within time
accuracy.
To integrate 3 clock types, was to get the best out of it with any
setup.
The next section will show some screenshots with different clocks and
time corrections (done with V3.0):
Sequencomat as rewire
slave:
Using
the rewireclock:
With a rewire clock both problems appear: there is a little timeshift
and there is a slight instability, as can be seen by comparing 1.2 and
1.3. Both problems are not big in amount (the grid in the background is
64th!)
Unfortunately it seems not possible to give the rewire clock a
time
correction in Ableton Live.
You can use "quantisize during recodring" to solve the instability on
recorded clips. Or you can use "track delay" at the bottom of a track
to compensate the
linear time shift on recorded tracks. But during live sequencing
you might have
this effect on timing.
Anyway, try it. The effect
is not so big and
the rewire clock got some other possitive aspects:
- it is easy to use and doesn´t need any sync out
- the sequencer will follow the songposition.
That means,a jump to bar 23 in your rewire master (ableton, logic,
cubase...) will cause the sequencer to follow that jump and all polyrhythmic
patterns (<16steps) will play the values
they
would have played, if you have started from 0 and are now on bar 23...
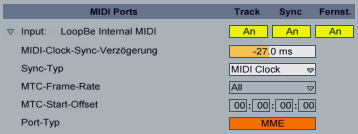
Sequencomat as midi slave
(1)
Using the masterclock from
Ableton and Sequencomat as midi slave without time correction:
(2) Using the masterclock from Ableton and Sequencomat as midi slave
with a time correction of -12msec:
(3) Output clock settings in ableton :
While using Ableton as master and SequencomatV3
as midi slave the time shift becomes bigger, as shown in picture (1).
You can correct this linear time shift with the output clock settings
(3) which results in an accurate triggering (2).
Note that the stability (variation between triggers) is better than in
rewire-slave mode.
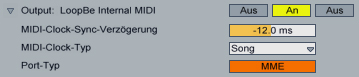
Sequencomat as midi master
(1)
Using the masterclock from
Sequencomat without time-correction:
(2) Using the masterclock from Sequencomat with time-correction of
-27msec:
(3) Input clock settings in Ableton:
Using the internal clock of SequencomatV3
as master and Ableton in slave mode results in a large timeshift (1). But with a time correction of
-27msec on clock input (3) this
clock-type got a very accurate and stable triggering (2).
You will notice some value jumping on the bpm monitor in Ableton while
using this clock, but that does not affect accuracy.
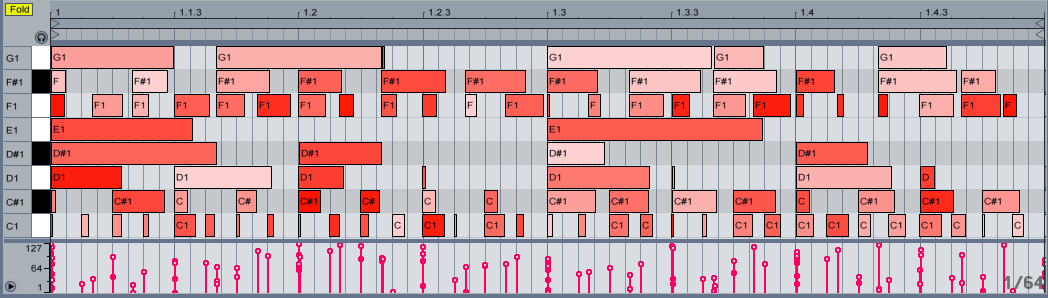
Timing test with version
3.3
Below
you see a screenshot of a
timing test using the Master clock of Sequencomat in actual
version 3.3 and slaving Ableton 8.1 to this.
8 tracks, each running on different grid (F, F# and G on triplet
grids!), with random step-velocity and step-length on all
steps,
recorded at 120 bpm.
For linear time correction the function "external clock delay" (on Sequencomat V3.3) was
set to 27 msec, while time corrections in the DAW were all turned to 0.
And as you see - even with heavy load - the clock stays stable.There is
only some slight inaccuarcy if you watch D# at 1.2 or D at 1.2.3.
However, the grid in the background (64th) represents timing blocks of
31,25 msec, so the inaccuracy is about +/-1 msec. This is really good
for a Midiclock, and you will hardly find another Midiclock doing the
job better ;)
Which clock should I use?
This
depends on your setup and you are free to choose.
You can change the clock with a button on the Lemur or on
the maxpatch and even jump during playback,
but for a accurate timing I would
suggest to stop one time and press play again.
I got the best results with the Sequencomat as master clock and a time
correction of -27msec.
Same while running in combination with Jazzmutant-MU - I had best
results
with this setup.
You can also use this sequencer as a "standalone", directly routing
midi to your synths.
(as Daniel demonstrated in his videos)
While
testing clock configurations keep in mind: Do
not use the same midiport for in
and out, this might cause a midifeedbackloop. Although
you have seen that I use
LoopBe in both cases, I always deactivated the other option before!
Change
log
As
this sequencer got an ongoing
development process, the version and
functions change:
Version
release
date
3.0
05-10
3.1
-
added "random" to playback direction
3.2
09-10
completely
reworked the maxpatch
- split of midiports (track1-4 / 5-8)
- steppropability including track LED indicators
- added 8CCs attached to track
- cutted breakpoint object for CC from previous version
- random function for stepvalues on velocity, length, CC
- rollpad values are now saved within the set
3.3
03-11
completely
reworked the maxpatch
- free definable scales and octaves (split between track1-4 /
5-8)
- true and scale-dependent transpose for octave and range
- random-step-value switches for octave, note, delay
- autosave function
- exclude-range-function for loading on velocity, length, delay,
propability, CC
- linear clock signal correction (in and out) on maxpatch
- position wheel with set songposition function
- CC parameter choice and display
- dislocated some variables to max to cut down lemur memory
3.3 colors
06-11
uses
same maxpatch as v3.3
- new Lemurtemplate with color shades for control objects
V3_lite
09-11
12-11
Liine
released the Lemur emulation for iPad
01-12
converted v3.3 and v3lite
to iPad
3.4
02-13
...after nearly 2 years
one more update
for Sequencomat v3:
enhanced the maxpatch, but kept compatible with 3.3
- program change transmitted stepwise via CC on controller 129
- reworked pattern chaining (free programable now)
- added function for patternjump (direct - 1/2 bar - 1 bar - 2 bars - 4
bars)
- next pattern blinks
- saved patternslots are highlighted
- 20 color shades including grey and 4 usercolors
- shortcut for 15 scales
Sets of versions 3.0 -3.3 of this sequencer are not compatible, so
keep them in different folders. Sets of version 3.3 and 3.4 are
compatible, but will miss the vector "patlight", which highlights saved
pattern slots. To build this vector save patterns again in same slot
and save the set using v3.4.
You can combine SequencomatV3 with any other Lemur modules (it is a
module, not a project file), like synth controlls or the max4live
Ableton control surface MU. (Although
you might see many videos
in combination with MU, the sequencer works with any DAW or even
without)
FAQ:
I
never worked with Max/Msp, is it very complicated to get Sequencomat
running?
No. As a user you just have to fill in some values during first setup
(Lemur IP,OSC targets).
I made a detailed setup guide and if you got any question you can ask
me anytime.
I use Max/Msp on my own, is it possible to edit the patch?
Yes. My patches are open and some parts are even commented.
So it might be a good link to improve your own Max-skills.
However, if you use parts of my Sequencomat-patch in your own patch,
you have to contact me first
before sharing it with others.
(as long as you only use it for your own it is no problem)
I do hold the copyright on SequencomatV3.
Please respect my developing effort :)
Why is the patch done in
Max and not in
max4live?
Although my main DAW is Ableton Live and I own also a copy of m4l, I
have done
the patch in normal Max for a bunch of reasons:
- compatibility with any DAW or working even without a DAW
- free runtime in Max, so no further cost for customers
- restrictions in m4l (no midichannel !)
But as said: it works parallel with m4l and templates like MU
Can
I change the colors on the Lemur?
SequencomatV3 contains some colorscripting, which is all done on the
Lemur (not in max). For more information
about colortemplates, please
see here. You
can also change size and shape of the control items. (Hey,
it is a LEMUR!)
So if you e.g. want the mute and trackchoice switches to change sides,
just do it!
But please never change the name of objects, delete them, or put them
into other containers.
I like the patch, but I
will need some
changes to fit to my personal setup. How can I do that?
You can try to expand the template on your own or you can send me a mail.
I do no more custom interfaces, but maybe I can have a look at your
wish with next update or give you a tip how to handle the problem.
Nice patch, but the price
is insane.....!
99,- Euro might look as much money. But if you keep the plenty of
functions in mind, you might understand.
SequencomatV3 adds the functionalitiy of hardwaresequencers to your
Lemur.
These hardwaresequencers cost about 10 times as much.
Until my initiative to sell sequencers on a broad basis, stepsequencers
on the Lemur were custom made
for a much higher price, or some free downloads with very restricted
functions.
I had the idea to open a market and make prices more affordable, so
more musicans can enjoy
touchscreen stepsequencing.
Just try thefree demo version.
Ha ha...., I have seen
SequencomatV3 on
torrent bit, so why should I pay?
Actually "SequencomatV3" appears on some torrent bit servers......
However, all I have downloaded till now are fakes. Some of them even
contain bad virus.
Those piracy companies - who distribute my stolen software...or more
concrete: who fake that they distribute my software - furthermore want
to to be paid for their "service". So you
will
pay for getting nothing than some new virus.
However, if you know a link on a torrent bit that works, please contact
me!
No worries, downloading is not illegal - you will get no trouble from
my side....more some big hugs!
For those who maybe plan to upload and share the patch, be aware that
every patch has a secret code that identifies the original user.
Sharing with out my permission is illegal and will be prosecuted. (Sorry, but I have to
mention that here)
Where
is the difference between all
that versions of Sequencomat?
I name all my stepsequencer SEQUENCOMAT. I like the name because it
reflects the typically „Automat“ ending in german
languange
and also drops „sequence“....and furthermore my
shortname
is „mat“.
The versions are according to their release date. With each change of
version I had to do some major changes in the framework. In V3 I did a
big jump while porting all value calcualtion and handling into max.
Each version got some updates in following number. In common the higher
the version the more details you can control.